Before you begin reading this guide, we recommend you run Elasticsearch Error Check-Up which analyzes 2 JSON files to detect many errors.
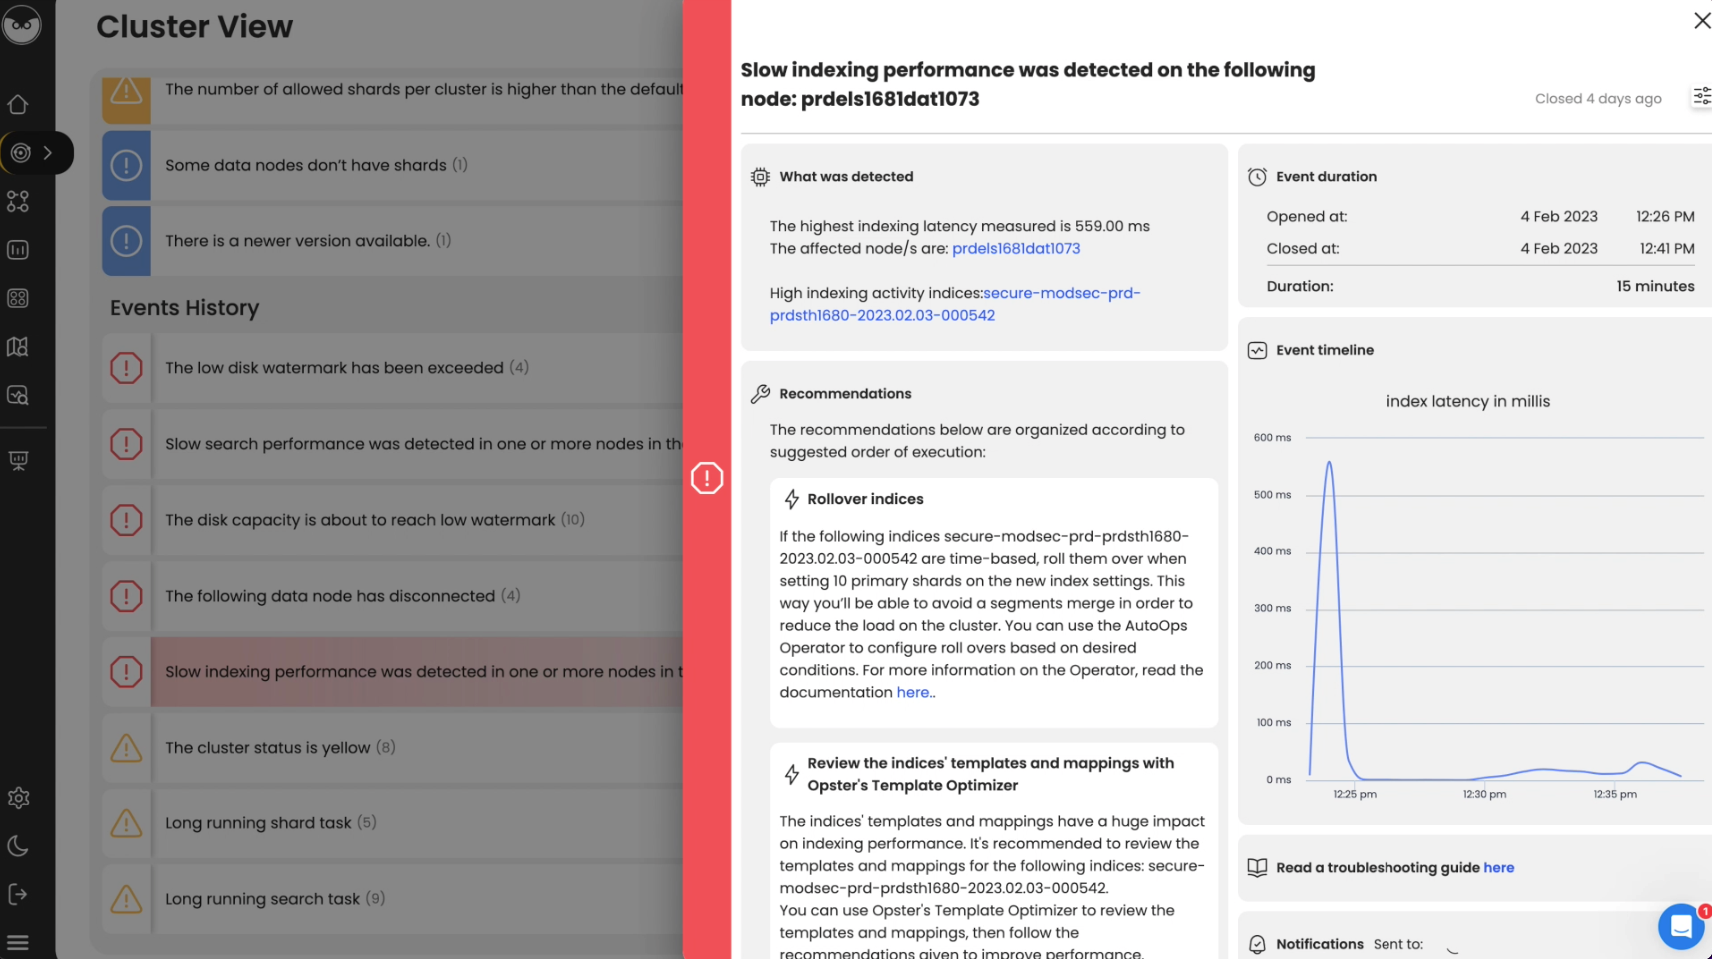
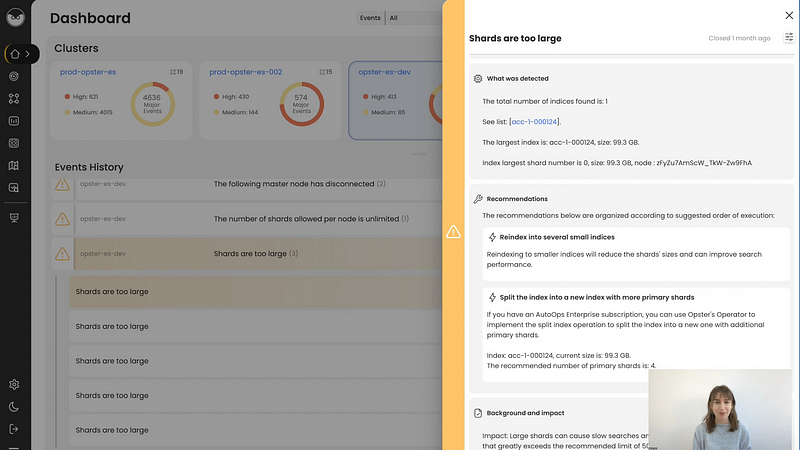
To easily locate the root cause and resolve this issue try AutoOps for Elasticsearch & OpenSearch. It diagnoses problems by analyzing hundreds of metrics collected by a lightweight agent and offers guidance for resolving them. Take a self-guided product tour to see for yourself (no registration required).
This guide will help you check for common problems that cause the log ” Reloading analyzers for index shard ” to appear. To understand the issues related to this log, read the explanation below about the following Elasticsearch concepts: index, plugin and shard.
Overview
In Elasticsearch, an index (plural: indices) contains a schema and can have one or more shards and replicas. An Elasticsearch index is divided into shards and each shard is an instance of a Lucene index.
Indices are used to store the documents in dedicated data structures corresponding to the data type of fields. For example, text fields are stored inside an inverted index whereas numeric and geo fields are stored inside BKD trees.
Examples
Create index
The following example is based on Elasticsearch version 5.x onwards. An index with two shards, each having one replica will be created with the name test_index1
PUT /test_index1?pretty
{
    "settings" : {
        "number_of_shards" : 2,
        "number_of_replicas" : 1
    },
    "mappings" : {
        "properties" : {
            "tags" : { "type" : "keyword" },
            "updated_at" : { "type" : "date" }
        }
    }
}
List indices
All the index names and their basic information can be retrieved using the following command:
GET _cat/indices?v
Index a document
Let’s add a document in the index with the command below:
PUT test_index1/_doc/1
{
  "tags": [
    "opster",
    "elasticsearch"
  ],
  "date": "01-01-2020"
}
Query an index
GET test_index1/_search
{
  "query": {
    "match_all": {}
  }
}
Query multiple indices
It is possible to search multiple indices with a single request. If it is a raw HTTP request, index names should be sent in comma-separated format, as shown in the example below, and in the case of a query via a programming language client such as python or Java, index names are to be sent in a list format.
GET test_index1,test_index2/_search
Delete indices
DELETE test_index1
Common problems
- It is good practice to define the settings and mapping of an Index wherever possible because if this is not done, Elasticsearch tries to automatically guess the data type of fields at the time of indexing. This automatic process may have disadvantages, such as mapping conflicts, duplicate data and incorrect data types being set in the index. If the fields are not known in advance, it’s better to use dynamic index templates.
- Elasticsearch supports wildcard patterns in Index names, which sometimes aids with querying multiple indices, but can also be very destructive too. For example, It is possible to delete all the indices in a single command using the following commands:
DELETE /*
To disable this, you can add the following lines in the elasticsearch.yml:
action.destructive_requires_name: true
Overview
A plugin is used to enhance the core functionalities of Elasticsearch. Elasticsearch provides some core plugins as a part of their release installation. In addition to those core plugins, it is possible to write your own custom plugins as well. There are several community plugins available on GitHub for various use cases.
Examples
Get all of the instructions for the plugin:
sudo bin/elasticsearch-plugin -h
Installing the S3 plugin for storing Elasticsearch snapshots on S3:
sudo bin/elasticsearch-plugin install repository-s3
Removing a plugin:
sudo bin/elasticsearch-plugin remove repository-s3
Installing a plugin using the file’s path:
sudo bin/elasticsearch-plugin install file:///path/to/plugin.zip
Notes and good things to know
- Plugins are installed and removed using the elasticsearch-plugin script, which ships as a part of the Elasticsearch installation and can be found inside the bin/ directory of the Elasticsearch installation path.
- A plugin has to be installed on every node of the cluster and each of the nodes has to be restarted to make the plugin visible.
- You can also download the plugin manually and then install it using the elasticsearch-plugin install command, providing the file name/path of the plugin’s source file.
- When a plugin is removed, you will need to restart every Elasticsearch node in order to complete the removal process.
Common issues
- Managing permission issues during and after plugin installation is the most common problem. If Elasticsearch was installed using the DEB or RPM packages then the plugin has to be installed using the root user. Otherwise you can install the plugin as the user that owns all of the Elasticsearch files.
- In the case of DEB or RPM package installation, it is important to check the permissions of the plugins directory after you install it. You can update the permission if it has been modified using the following command:
chown -R elasticsearch:elasticsearch path_to_plugin_directory
- If your Elasticsearch nodes are running in a private subnet without internet access, you cannot install a plugin directly. In this case, you can simply download the plugins and copy the files inside the plugins directory of the Elasticsearch installation path on every node. The node has to be restarted in this case as well.
Overview
Data in an Elasticsearch index can grow to massive proportions. In order to keep it manageable, it is split into a number of shards. Each Elasticsearch shard is an Apache Lucene index, with each individual Lucene index containing a subset of the documents in the Elasticsearch index. Splitting indices in this way keeps resource usage under control. An Apache Lucene index has a limit of 2,147,483,519 documents.
Examples
The number of shards is set when an index is created, and this number cannot be changed later without reindexing the data. When creating an index, you can set the number of shards and replicas as properties of the index using:
PUT /sensor
{
    "settings" : {
        "index" : {
            "number_of_shards" : 6,
            "number_of_replicas" : 2
        }
    }
}
The ideal number of shards should be determined based on the amount of data in an index. Generally, an optimal shard should hold 30-50GB of data. For example, if you expect to accumulate around 300GB of application logs in a day, having around 10 shards in that index would be reasonable.
During their lifetime, shards can go through a number of states, including:
- Initializing: An initial state before the shard can be used.
- Started: A state in which the shard is active and can receive requests.
- Relocating: A state that occurs when shards are in the process of being moved to a different node. This may be necessary under certain conditions, such as when the node they are on is running out of disk space.
- Unassigned: The state of a shard that has failed to be assigned. A reason is provided when this happens. For example, if the node hosting the shard is no longer in the cluster (NODE_LEFT) or due to restoring into a closed index (EXISTING_INDEX_RESTORED).
In order to view all shards, their states, and other metadata, use the following request:
GET _cat/shards
To view shards for a specific index, append the name of the index to the URL, for example:
sensor:
GET _cat/shards/sensor
This command produces output, such as in the following example. By default, the columns shown include the name of the index, the name (i.e. number) of the shard, whether it is a primary shard or a replica, its state, the number of documents, the size on disk, the IP address, and the node ID.
sensor 5 p STARTED    0  283b 127.0.0.1 ziap
sensor 5 r UNASSIGNED
sensor 2 p STARTED    1 3.7kb 127.0.0.1 ziap
sensor 2 r UNASSIGNED
sensor 3 p STARTED    3 7.2kb 127.0.0.1 ziap
sensor 3 r UNASSIGNED
sensor 1 p STARTED    1 3.7kb 127.0.0.1 ziap
sensor 1 r UNASSIGNED
sensor 4 p STARTED    2 3.8kb 127.0.0.1 ziap
sensor 4 r UNASSIGNED
sensor 0 p STARTED    0  283b 127.0.0.1 ziap
sensor 0 r UNASSIGNED
Notes and good things to know
- Having shards that are too large is simply inefficient. Moving huge indices across machines is both a time- and labor-intensive process. First, the Lucene merges would take longer to complete and would require greater resources. Moreover, moving the shards across the nodes for rebalancing would also take longer and recovery time would be extended. Thus by splitting the data and spreading it across a number of machines, it can be kept in manageable chunks and minimize risks.
- Having the right number of shards is important for performance. It is thus wise to plan in advance. When queries are run across different shards in parallel, they execute faster than an index composed of a single shard, but only if each shard is located on a different node and there are sufficient nodes in the cluster. At the same time, however, shards consume memory and disk space, both in terms of indexed data and cluster metadata. Having too many shards can slow down queries, indexing requests, and management operations, and so maintaining the right balance is critical.
Log Context
Log “reloading analyzers for index shard” classname is TransportReloadAnalyzersAction.java.
We extracted the following from Elasticsearch source code for those seeking an in-depth context :
         return new ReloadAnalyzersRequest(in);
    }


Override
    protected ReloadResult shardOperation(ReloadAnalyzersRequest request; ShardRouting shardRouting) throws IOException {
        logger.info("reloading analyzers for index shard " + shardRouting);
        IndexService indexService = indicesService.indexService(shardRouting.index());
        List reloadedSearchAnalyzers = indexService.mapperService().reloadSearchAnalyzers(indicesService.getAnalysis());
        return new ReloadResult(shardRouting.index().getName(); shardRouting.currentNodeId(); reloadedSearchAnalyzers);
    }
Find & fix Elasticsearch problems